How To Sell Online Courses on WooCommerce
Online Courses · 2022-09-02
Introduction to selling your course on WooCommerce
WooCommerce is a WordPress plugin that is tailored to provide e-commerce platform service (Nexcess, 2021). The plugin was launched on September 27, 2011, and rose quickly to be one of the most used plugins by high-traffic websites (Perez, 2011). It contains numerous extensions, add-ons, and plugins that exist in both paid and free categories. The plug-in is an open source, and this has driven its success as the great community develops many extensions and plugins that increase efficiency and functionality (Melogli, 2022). It has the power to transform any WordPress website into a fast and efficient e-commerce platform. Its flexibility and compatibility with WordPress are unparalleled; it has emerged as the most efficient content management system compared to other plugins offering the same services. This article seeks to explain how to sell your online classes or cohorts using WooCommerce.
Step One: Installing WooCommerce
From the WordPress dashboard, navigate to Settings, and click on the General button. Navigate to Settings → General Settings and click on the Membership check box. This allows any member to register for our Course. To Install the WooCommerce for LearnDash add-on, navigate to Learn Dash LMS→Add-ons; this will direct you to the available LearnDash Add-ons web page.

Select the WooCommerce for LearnDash add-on, then proceed to click the Install Now button. From the WooCommerce Installation page, click the Activate Plugin button to activate WooCommerce for LearnDash add-on for use in WordPress. To install the WooCommerce Plugin, navigate to Plugins → Add New; from the Add Plugins page, search for WooCommerce, then click the Install Now button. After a successful installation, activate the plugin by clicking on the Activate button. From the Welcome to WooCommerce page, provide the following business details; Address line 1 or 2, Country or Region, Postal Number, and email address, then click the Continue button. From the Industry Type web page, click the Education and Learning checkbox, then click the Continue button to proceed to the Products Type page**.** Uncheck the Physical products option since online courses are not physical products, then click Continue. From the Business details page, select I don’t have any products yet, then click Continue. From the Choose theme page, explore all the available themes and select one that’s appealing to the eye, then click Continue.
Step Two: Configuring WooCommerce
Navigate to WooCommerce → Settings, from the Accounts and Privacy page, and perform the following actions;
· Activate Allow Customer to log into an existing account during checkout.
· Activate Allow Customer to create an account during checkout.
Then click the Save Changes button.
Navigate to WooCommerce → Settings, from the Payments page, and perform the following actions;
· Click on the Get Started Button to install and activate Stripe payments
· Click on the Get Started Button to install and activate PayPal
Use the generated secret keys to link your WooCommerce to the activated accounts.
Step Three: Adding Courses
To add a Course, navigate to WooCommerce → Products → Add New; from the Add New Product page, add the course name in the Add new Product field and Course Description in Add Product Description field. WooCommerce allows sellers to specify the type of product they’ll want to offer in their online store. It supports the following Product types; Simple Product, Grouped Product, External /Affiliated Product, Variable Product, and Course. For this case, you need to let it be Course, achieved by navigating to WooCommerce → Products → Add New; under the Product Data section, define the type of data as Course. To configure the pricing of courses, navigate to WooCommerce → Products → Add New; under the Product Data section, click the General option and choose your preferred course pricing by filling the Regular Price and Sale Price fields**.** From the LearnDash Courses field, select the name of the current Course.
From the Learn Dash Course Grid Settings section, fill in the Short Description field; this description will appear on the store page and will provide visitors with an overview of what the Course is about. It also allows you to specify the length of the Course through the Duration field. Sellers can also choose to have a video on the store page; this allows visitors to view the course details using the video, which is more attractive compared to just having a course description done in text format. To set up a video, navigate to the enable Video Preview section and make proper configurations as per your liking. Click the Publish button to finish setting up the Course. Remember to Copy the Permalink generated under the Product Name field.
Step Four: Finishing Set Up
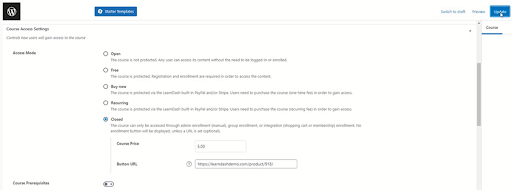
Navigate to LearnDash LMS → Courses; under the Courses page, navigate to the Courses tab; this will avail a list of all courses that we have previously published. Select the Course of interest by checking the check box adjacent to the Course. Proceed to click the edit button; this will direct you to the Course Page. Click the Settings button so as to configure various course settings. This section allows you to provide the relevant Course Materials; it also allows you to come up with a Course Certificate. You can also choose to include challenge exams for the Course by selecting the Challenge Exam Show option. This section provides you with the option of Course Content visibility, select the Always Visible option; this will allow even visitors to see the structure of your course content. Navigate to the Course Access Settings; you need to define the Access modes for your Course. This section provides the following access modes; Open, Free, Buy Now, Recurring, and Closed. Select the Closed option, then proceed to specify the Course Price; this enables visitors to access the Course using the Shopping Cart option. Lastly, paste the permalink copied from the Learn Dash Course Grid Settings → Product Name field to the Button URL field, which allows visitors to navigate to the Product Page upon fulfilling the shopping cart. Lastly, notify visitors of the previous knowledge needed before undertaking the Course in the Course Prerequisites section. Click the Update button to save the changes. To Preview the entire Course in visitor view, click the Preview button.
Conclusion
In conclusion, this article sought to provide a clear description of how to sell online courses on WooCommerce. It has achieved this by explaining all the steps involved in setting up the WooCommerce Plugin, explaining the steps followed to configure the membership of course participants, and setting up the price of the Course. We also went over how to link a payment gateway and configure the visitor page.