How To Sell Online Courses on Wix
Online Courses · 2022-09-02
Introduction to selling your course on Wix
Wix.com.ltd is a software development company based in Israel; it allows the creation of websites and mobile apps by utilizing its highly efficient drag-and-drop tools (Zukerman, 2012). The company has numerous offices in other parts of the globe, such as; Singapore, Japan, India, Germany, and the United States (Wix, n.d.).
This platform is a wordpress alternative (for those who are tired of the constant updates and error that come from its plug ins). Most people use it to create web and mobile applications that cover the following areas; Community forums, social media apps, and E-commerce platforms. It is estimated that this tool is currently used by approximately 2.4 per cent of all major ten million websites on the globe (W3Techs, n.d.). It offers hundreds of beautiful templates that make application development simpler by saving developers extended page styling hours. This article seeks to explain how to sell your online classes using Wix.
Step One: The Installation
From the Wix editor page, click the + Add button; from the Wix App Market search bar, search for Online Programs. From the search result, identify Wix Online Programs by Wix. To install the app on the Wix editor, click the Add to site Button. Upon successful addition of the Wix Online Programs app, the Wix editor will load the available programs as shown below.
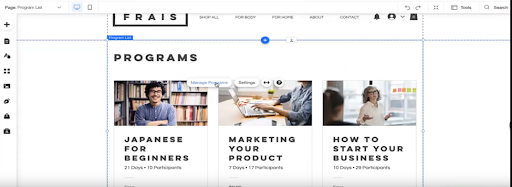
Click the Manage Program option from the Wix editor; this will allow you to configure the available templates based on what suits your application. Starting from scratch always gives one the necessary flexibility in choosing features in the website. To create an online course program, click the Start Fresh Template present on the getting started web page, then click Next. This will redirect you to the program title page; from the Name text area, provide the name that you would like to call your program, then click Next. From the Pace web page, select the most favourable pace that you would like to have learners follow; Wix offers only two options; Self-Paced and Scheduled. The scheduled option places learners on a tight learning schedule covering a specific number of days, whereas the self-paced option allows learners to start and finish the online course on any given day.
How to set up and upload your course
Step One: Cover Page
Upon selecting the most favourable pace for your online course, click the Let’s Go button. Navigate from Programs → Program details, then click the edit button. This will redirect to the Program Settings page; click on the Basic Info option to provide basic program details. From the Basic info page, fill in the following text areas; Program Name, Description, and Category. The information supplied in this region is what makes the Cover page that people see before subscribing to the online course. The Category section allows one to group courses based on their similarities or ones that meet a certain category. The Cover Image section allows one to upload an image that would make up the Cover page; this image can be selected from the available images or customized images. Remember to click the Save button to save the cover page configurations.
Step Two: Pricing and Visibility
Navigate to Programs → Program Settings → Pricing and Visibility; the visibility setting offers sellers three categories; Public, Private, and Secret. The public option allows any interested individual to join the online course, while the private option only allows members who are approved by the seller. The secret option only allows invited members to join the online course. From the Pricing section, choose the Pay to Join option; this will allow you to give a charging price for your online course. Alternatively, you could create a subscription plan from the Create Subscription button; this allows individuals under membership programs to enjoy recurring payments. From the Number of Participants section, choose whether to have a Limited or Unlimited number of participants. For cases of Limited Participants, create a maximum number of participants who can join the online course program. Lastly, configure the Step Visibility option; this allows you to control whether you need learners to see the upcoming learning steps. Remember to click the Save button to save the configurations.
Step Three: Groups and Badges
Navigate to Programs → Program Settings → Groups and Badges. This section allows one to create and name badges; these badges can then be awarded to participants upon achieving a given target in the learning curve. Importantly, this section also has a Group feature that allows the creation of a chat group where individuals taking the online course can discuss their performance. To activate the feature, click the Group radio button. Remember to click the Save button to save the configurations.
Step Four: Scheduling of Course Events
Navigate to Programs → Schedule; this section allows you to create events for each specific day in the course schedule. To create an event or step, hover over the date section and click the popup Add Step button. This directs one to the Edit Step dialog box for the purpose of describing the new step. It also allows sellers to describe the course content from the description section; they can also include test Quizzes and Questionnaires for the purpose of assessing understanding and getting feedback. It’s always a good habit to preview the course before publishing; this ensures that one effectively customizes the layout to suit learners. The prereview offers two view options; Visitor View and Participant View. The Visitor view shows the course cover page as it would appear before enrolling for the online course, whereas the Participant view shows what enrolled students view. From the Wix editor, click Save to apply any changes performed on the layout, then click Publish.
Management of Online Courses
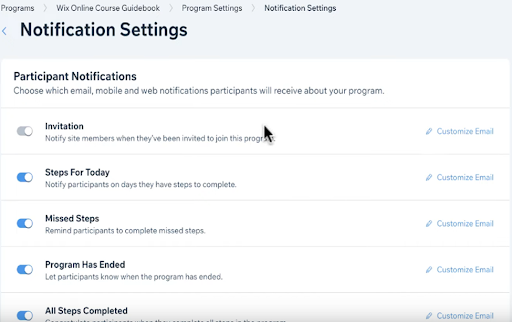
To keep track of online courses, navigate to Online Programs → Programs; this will reveal a list of published courses. Click into any one of them and select the manage button to direct to the Program Participant Page; this reveals a list of all participants. From this section, one can view the progress of participants; Wix allows sellers to see steps that have been completed and missed by each participant. It also allows them to configure participant notifications through the Notifications Settings page. Sellers can notify active participants when the program has ended or missed and completed steps.
Conclusion
This article sought to explain how to sell online courses on Wix; it has achieved this by first explaining how to install the Wix Online Programs app onto the Wix editor. It has further explained how to create superb cover pages, configure pricing and visibility, schedule course events, and award badges. Lastly, it has also explored different ways of managing the online courses and the participants.