How to Sell Online Courses on Squarespace
Online Courses · 2022-09-02
Introduction to selling your course on Squarespace
Squarespace is a company that builds and hosts websites; it originates from America (Squarespace, n.d.). It operates under the SaaS cloud computing model by availing its clients a codeless website creation environment (Tapia, 2022). The platform features a huge variety of built-in website blueprints and themes, thus saving developers time used in styling webpages. The platform also allows clients to use the codeless development feature to customize website templates and add functionality to the web pages. Founded in 2004 by Anthony Casalena, the platform started as an environment for hosting blogs and later diversified into; the provisioning of e-commerce services, analytics, codeless web development, and domain name creation (Clifford, 2016). The platform is heavily relied upon for its services; it is utilized by more than 1.9 percent of the major ten million websites (W3Techs, n.d.). This article seeks to explain how to sell online courses using Squarespace.
Step one: Creating Course Page
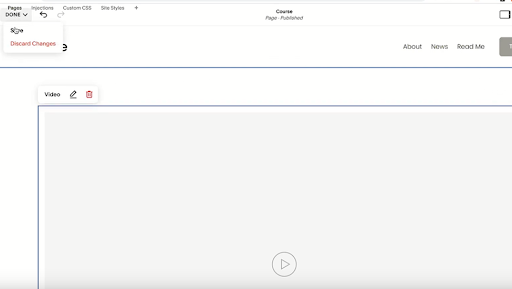
The first step when selling an online course at Squarespace is creating a course page. This can only be achieved after setting up a website on Squarespace. To create a course page, log in to the Squarespace dashboard; from the Pages section, click on the Add Page button. From the popup box, click on the Blank Page button. Assign the new page a name; the name can portray what the page contains for the purposes of organization. Depending on the size of the online course, choose the number of pages needed. Simple short courses will only need a single web page, whereas lengthy ones require multiple pages. Click on the Edit button to add new content to the course page. Squarespace provides users with the ability to add sections. To add new sections to the course page, click the add section button. Each section can accommodate headlines, lists, galleries, images, quotes, and text. This allows you to include all types of course content on the course page. To have videos on the course page, you need to embed the video URL on the Content Section; Squarespace only allows for videos to be linked from Video and Vimeo but does not host them. For videos on YouTube, viewership can be restricted by making them private or unlisted; this will ensure that only course members are granted viewing rights. On the Done down box, click Save to store the course content on the course page.
Step Two: Password Protecting the Course Page
From the Navigation Sidebar, Select the Course Page, then click on the little Gear icon. This should direct you to the Page Settings page; under the General Settings category, navigate to the Password field and add a member password. This usually restricts individuals without a password from gaining access to the contents of the course page. Click the Save button. To determine whether the page is password protected, select the Course page in the Navigation sidebar; a little padlock icon should appear to denote password protection.
Step Three: Designing Lock Page
Squarespace provides you with a default Lock Page; the lock page can, however, be designed to be more appealing to visitors. To change the Lock Page Design, navigate to Home → Design → Lock Screen; the design page allows you to change the entire layout for the lock page. It also allows you to add branding messages and illustrations from the Branding and Text section. You can also style the fonts and colors used by text in the lock page by visiting the Style section. This page also allows you to add images by visiting the Media section**.** This Lock Design is applied to all password-protected pages and blogs; thus, it’s important to have it tailored for generic use.
Step Four: Configuring Checkout
This option allows visitors to pay before getting access to the course page; it ‘s only available in the Squarespace Business plan and above but not in the Personal plan. It is important to note that the Business Plan charges some fee on each purchase made. Therefore, the Commerce Basic and Advanced plans are more suitable as they do not charge for transactions. To add a checkout, navigate to Home → Pages; on the Not Linked section, click the + icon; on the Collections category, Click the Store button denoted by a shopping cart. From the Add Store design page, choose your most preferred store template. Give the store an appropriate name at the Navigation Side Bar.
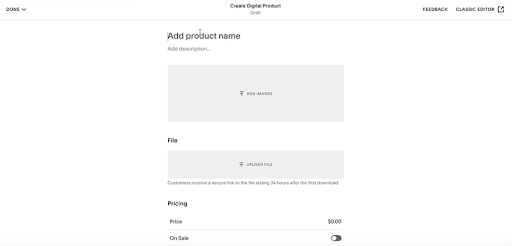
Custom Store Templates come with dummy products; select all the dummy products on the store, then delete them by clicking the Delete button. To create a new product, click the + button; from the What Do You Want Sell pop-out window, click the Digital section. From the Create Digital Product page, provide the course name at the Add product name field, provide the course description from the Add description section, Create a document that has a hyperlink and password to the course page using the text editor, and upload this document on the File section. From the Pricing section, add the course price a turn on the On Sale button. On the Done drop**–**down box, click Save and Publish to store the store configurations. The e-commerce page is now live from your store.
Conclusion
After reading this article you should now have an idea of how to get your course onto squarespace so that you can start selling it. We’ve covered the following four steps; Creating a Course Page, Password Protecting the Course Page, Designing the Lock page, and Configuring Check out. The article has also explained the advantages of choosing the Commerce plans compared to the Personal and Business plans. These are the simple steps needed to get your classes or cohort uploaded and selling on the platform.